Django Rest Auth social authentication tutorial
Setting up social authentication for Django Rest Framework may be a pain, there also exists several third-party modules to achieve this, Django Rest Auth is our pick, being based on Django AllAuth, it takes care of most of the work by itself, and also allows for a very wide range of social authentication sources.
However, making this whole machine work is not that trivial, especially because of the minimal Django Rest Auth’s documentation.
In this post, we are going to build a minimal working example of Django back-end application accepting GitHub authentication.
In order not to lose anyone, we are going to start from the bare beginning of any usual Django project.
tl;dr: the final example project is available from this repository.
Creating usual Django with Rest Framework project
You probably already have it installed but we first have to install Django (you may want to setup a virtual environment first):
$ pip install django
Now create a new project through django-admin and move into created directory:
$ django-admin startproject app
$ cd app
You should now get the following files structure:
$ tree
.
├── app
│   ├── __init__.py
│   ├── settings.py
│   ├── urls.py
│   └── wsgi.py
└── manage.py

1 directory, 5 files
Also add Django Rest Framework, first installing it:
$ pip install djangorestframework
Then adding it to project’s apps, as well as its authtoken app, in app/settings.py:
INSTALLED_APPS = [
    'django.contrib.admin',
    'django.contrib.auth',
    'django.contrib.contenttypes',
    'django.contrib.sessions',
    'django.contrib.messages',
    'django.contrib.staticfiles',

    # add the following two apps
    'rest_framework',
    'rest_framework.authtoken'
]
We are going to use token-based authentication, we hence have to specify it in our configuration file (still in app/settings.py)
REST_FRAMEWORK = {
    'DEFAULT_AUTHENTICATION_CLASSES': (
        'rest_framework.authentication.TokenAuthentication',
    )
}
Installing Django Rest Auth
For the first steps following the documentation is enough, so let’s do this.
Install Django Rest Auth:
$ pip install django-rest-auth[with_social]
Do not forget the social capabilities install option. Now add it to project apps:
INSTALLED_APPS = [
    ...,
    'rest_framework',
    'rest_framework.authtoken',
    'rest_auth'  # here
]
Let us now add Django Rest Auth views to our project, in app/urls.py (note that we are using Django 2.0 URLs routing syntax):
from django.contrib import admin
from django.urls import include, path

urlpatterns = [
    path('admin/', admin.site.urls),
    path('auth/', include('rest_auth.urls'))  # here
]
We can now migrate all our changes to database with the usual command:
$ python manage.py migrate
That was the easy part, let’s now get into the hairy one.
Social authentication configuration
As before, we can start following the documentation. Because Django Rest Auth relies on Django AllAuth, we have to add it to project apps as well. We also need django.contrib.sites and rest_auth.registration apps. We hence end up with this:
INSTALLED_APPS = [
    ...,
    'django.contrib.sites',

    'rest_framework',
    'rest_framework.authtoken',
    'rest_auth',
    'rest_auth.registration',
    'allauth',
    'allauth.account',
    'allauth.socialaccount',
]
Because we are using django.contrib.sites, we need to specify our site ID, once again in app/settings.py:
SITE_ID = 1
Because we want to make it possible to login using GitHub, we have to add this app as well:
INSTALLED_APPS = [
    ...,
    'allauth.socialaccount.providers.github'
]
Adding these apps also implicitly added some models to the project, we thereforce have to migrate them to our database:
$ python manage.py migrate
We are going to add a model instance to our database through admin interface (one can also do this programmatically though). So let’s add a superuser and run our development server:
$ python manage.py createsuperuser
$ python manage.py runserver
Now head to the admin interface of our local server (http://localhost:8000/admin by default) and login using the superuser credentials you just entered.
You may run into an HTTP 500 error with error code such as
django.contrib.sites.models.DoesNotExist: Site matching query does not exist.
this is because you forgot to add the SITE_ID config variable to settings.py as specified in previous step, check it out)
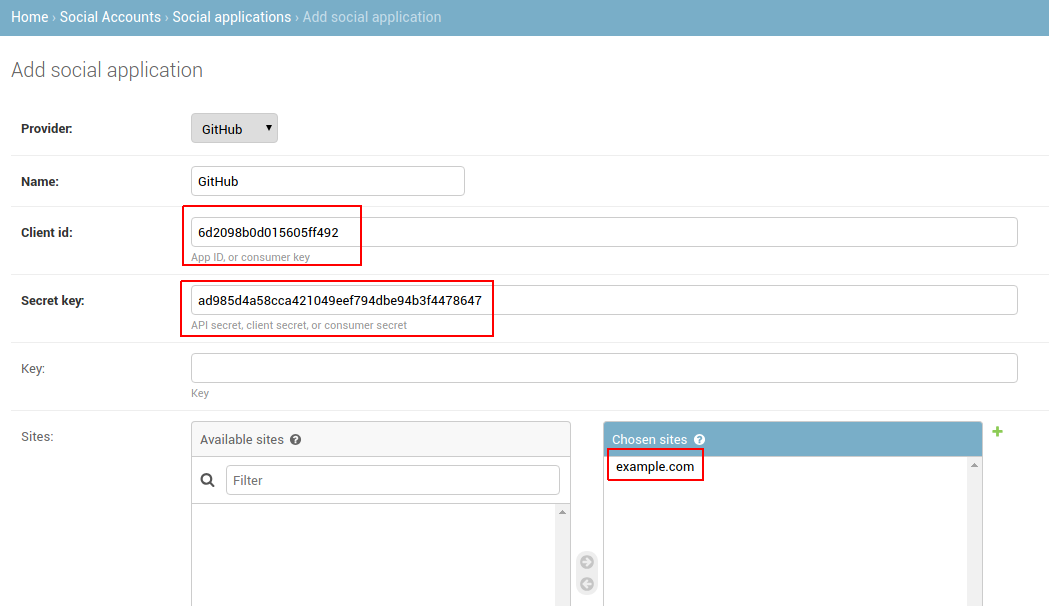
Click Social Applications then Add Social Application (here by default).
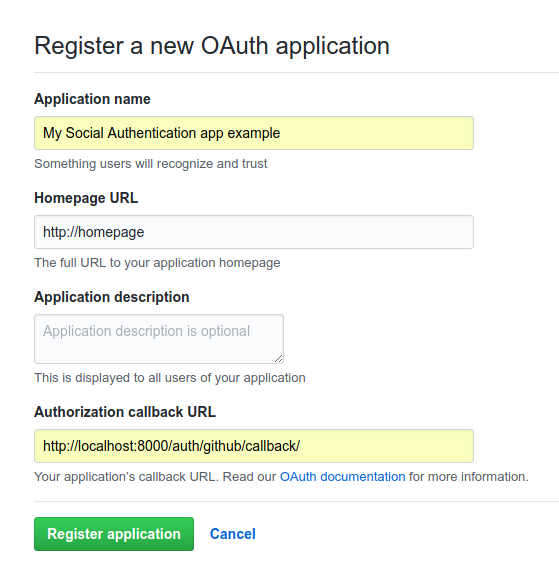
We require GitHub application credentials, that you may add from this page https://github.com/settings/applications/new, here is what I used:
We can now fill our new Social Application, do not forget to add the default website (example.com in our case) to Sites field:
Save this and let’s now go on adding views and urls.
Because we want to login with GitHub, we have to define a specific view for it. Let us add all these in app/urls.py (do not do this in production, it is just of the sake of simplicity in that tutorial).
First define the GitHub login view, deriving from generic social login view:
from allauth.socialaccount.providers.github import views as github_views
from allauth.socialaccount.providers.oauth2.client import OAuth2Client
from django.urls import reverse
from rest_auth.registration.views import SocialLoginView


class GitHubLogin(SocialLoginView):
    adapter_class = github_views.GitHubOAuth2Adapter
    client_class = OAuth2Client

    @property
    def callback_url(self):
        # use the same callback url as defined in your GitHub app, this url
        # must be absolute:
        return self.request.build_absolute_uri(reverse('github_callback'))
And add that view to URL patterns:
urlpatterns = [
    ...,
    path('auth/github/', GitHubLogin.as_view())
]
We have to fix that missing callback view. Because our app is a back-end API only, we want our callback view to redirect the user to front-end, including query parameters:
import urllib.parse

from django.shortcuts import redirect

def github_callback(request):
    params = urllib.parse.urlencode(request.GET)
    return redirect(f'https://frontend/auth/github?{params}')
urlpatterns = [
    ...,
    path('auth/github/', github_callback, name='github_callback')
]
(In reality front-end URL should probably be set in some sort of configuration, such as environment variable for instance)
We now need to retrieve the OAuth2 authorize URL, in our case it should look (almost) like this:
https://github.com/login/oauth/authorize?&client_id=6d2098b0d015605ff492
We could of course generate this address on front-end, but it is a much better idea to retrieve it from back-end. Fortunately, such view already exists wihtin Django AllAuth module:
from allauth.socialaccount.providers.github import views as github_views

urlpatterns = [
    ...,
    path('auth/github/url/', github_views.oauth2_login)
]
This view will automatically redirect the user to authorize URL, with reverse('github_callback') as callback (hence the GitHubLogin URL name above), as you can see here (removed non-relevant output):
$ curl -I http://localhost:8000/auth/github/url/
HTTP/1.1 302 Found
Location: https://github.com/login/oauth/authorize?client_id=6d2098b0d015605ff492&redirect_uri=http%3A%2F%2Flocalhost%3A8000%2Fauth%2Fgithub%2Fcallback%2F&scope=&response_type=code&state=p00Sh6Yy11mW
And connecting to this url successfully displays this OAuth2 authorization page:
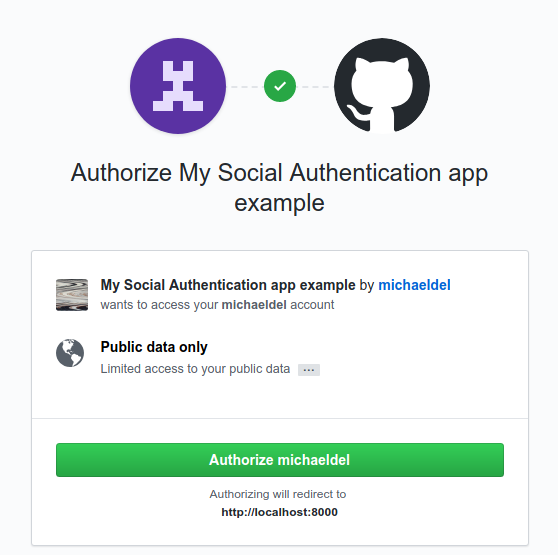
After having clicked, we are successfully redirected to our (imaginary) front-end app:
https://frontend/auth/github?code=b1e5c63da789d1382d32&state=p00Sh6Yy11mW
We can check that our new user actually got registered:
>>> from django.contrib.auth.models import User
>>> u = User.objects.last(); u
<User: michaeldel>

>>> from allauth.socialaccount.models import SocialAccount
>>> sa = SocialAccount.objects.last(); sa
<SocialAccount: michaeldel>

>>> sa.get_provider().name
'GitHub'
It works, yay!
Connecting
We now have to retrieve the authentication token from front-end, and thanks to our redirection, we have everything we need in URL query params to request it:
$ curl -X POST localhost:8000/auth/github/ -d code=b1e5c63da789d1382d32
{"key":"c73e3520d4a915bc700f875e9654db4542358df3"}
Here is our authentication token, we can use it to request, for instance, our user details, which are not accessible without being authenticated:
$ curl localhost:8000/auth/user/
{"detail":"Authentication credentials were not provided."}
Whereas we can successfully read them using that authentication token:
$ curl localhost:8000/auth/user/ -H "Authorization: Token c73e3520d4a915bc700f875e9654db4542358df3"
{"pk":3,"username":"michaeldel","email":"","first_name":"","last_name":""}
Scope
Great, we finally managed to get authenticated through GitHub, however our created user seems to be lacking some data, like email for instance:
>>> u.email
''

>>> sa.extra_data['email'] is None
True
This is because the default GitHub OAuth2 scope only grants access to public information, which may of course not include email.
Fortunately, it is pretty easy to change that using Django AllAuth settings, again in app/settings.py, using the GitHub’s OAuth2 scopes reference:
SOCIALACCOUNT_PROVIDER = {
    'github': {
        'scope': ('user:email',)
    }
}
Now the user email should properly set.
Conclusion
This was a brief introduction on how to use Django REST Auth for social authentication. Some topics (such as state validation) were not covered here, I hence recommend you to check out this nice gist containing this additional information.
I also have created a small example repository for you to test this at the following URL: https://github.com/michaeldel/django-rest-auth-social-example